Master Bus:
SSL Native Bus Compressor 2 (Solid State Logic)
– TLDR Notes:
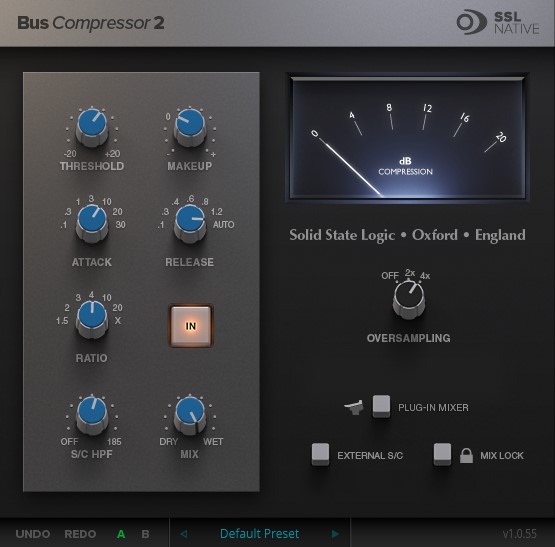
The official SSL bus compressor. Very nice compression action and stereo image, impressive clean yet slightly excited sound in the mids and highs. Reaches its full potential when set to OSx4 via the Oversampling knob.
– Review:
When it comes to the legendary SSL G series bus compressor in modeled plugin format doesn’t get much better than SSL’s own version. That conclusion is not based on the flawed logic that because it’s from the original source it must be superior, but based on my level matched tests with other contender this one simply sounds as you’d expect from SSL and does so with great definition at Oversampling set to 4x.
On the master bus, assuming it’s an mid/up tempo song (as opposed to a ballad) the settings in the image usually work very well. Attack set to 10 ms to achieve snappy transients and release set to either ‘Auto’ or one of the fastest release options. That’s a classic approach to SSL bus compression for good reason. Personally I like to setting the sidechain filter (“S/H HPF”) similar to the image, so that the lows don’t over-activate the compressor circuit.
A master bus is a demanding position for a compressor, because you’re feeding it a full, dynamic complex signal and what is placed on the master bus affects everything that is heard by the listener.
I don’t like slamming any bus compressor, and with the settings mentioned I find that the best outcome for indie, pop, rock result from max 2 dB of gain reduction at the loudest peaks. This may be different for genres like EDM.
Since being a master bus compressor is such a demanding task, and we’ve already established that SSL Native Bus Compressor 2 excels when it comes to compression action, stereo image and sonic texture, one big elephant in the room remains; How does it handle the low end?
This is an Achilles’ heel of so many modeled compressors, which is sometimes of little importance and sometimes a deal breaker depending on the application. In my opinion the SSL Native Bus Compressor 2 does an acceptable job in that area for master bus application. ‘Acceptable’…which is more than most modeled plugin compressors and cause for celebration.
The lows are still not quite as “full” feeling as the hardware, but this can be helped somewhat by putting an EQ in front of the compressor, with a relatively broad bell boost around 80Hz, boosting up to 1dB, and set the S/C HPF in the SSL compressor to 110Hz or so to avoid the compressor circuit reacting too much to the increased lows.
The plugin looks great, which never hurts, is very easy to use and deserves high praise for fully living up to expectations bestowed upon SSL’s software version of their iconic compressor.
N09GE (AlexB)
– TLDR Notes:
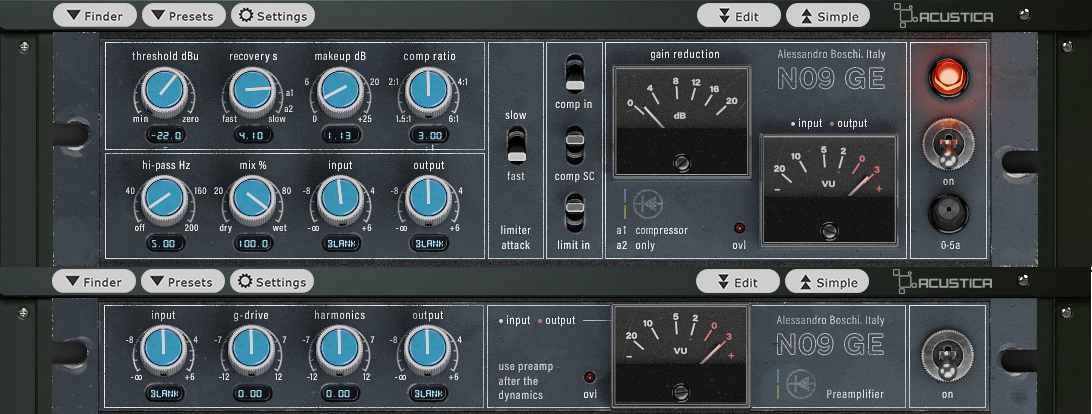
Go-to on master bus.
Using it in comp mode.
Fast auto release, compressing only 1-2 dB.
Fast auto release is ‘recovery’ in a1 mode (4.10 value).
(a2 is auto slow.)
Preamp after comp instance.
– Review:
Unless the characteristic SSL sound is required, there are some equally great options out there, chief among them the Neve 33609 compressor/limiter.
I would classify it as even more versatile than an SSL bus compressor, with it’s feedback circuit and 1.5 ratio option perfect for adding some subtle punch and glue on the stereo mix.
The Neve 33609 is also a useful compressor on invidual tracks, Tom Lord Alge likes it on snare for instance (followed by saturation to subtly bring down the peaks when using modelled software versions).
The reason why this particular version is chosen, the AlexB N09GE, is the way it makes the material feel. It’s an organic, plastic-free sound that can easily become a go-to compressor for anyone who likes subtle, tasty compression and texture on a master bus that just feels right.
The original stereo compressor uses diode-bridge topology and is known for it’s musicality on busses and AlexB did a great job capturing the unit.
It works out of the box, but I recommend downloading the azzimov skin (shown in image) for ease of use, workflow speed as well as an overall aesthetic upgrade.
I have a standard setting for master bus application that always seem to give the desired result without fail. Those settings may appear to be very conservative, but that’s where this one shines.
In compression mode (Comp “in”) set it to fast auto release and keep an eye on the meter. Let it reduce just 1-2 dB.
Fast auto release is achieved by setting the ‘recovery’ knob to ‘a1’ mode (value should read 4.10) (a2 is ‘auto slow’).
The preamp module is inserted after the compressor, and if working in 44.1 you can still use the 96. kHz preamp library. This is not officially recommended but it gives a similar yet slightly more open sound than when working at 44.1 that may be preferable sometimes.
The N09GE requires the full version of Nebula from Acustica Audio, N4 (or higher). N4Player is not enough.
Shadow Hills Class A Mastering Compressor (Brainworx)
– TLDR Notes:
This gives movement while adding some glue to the mix.
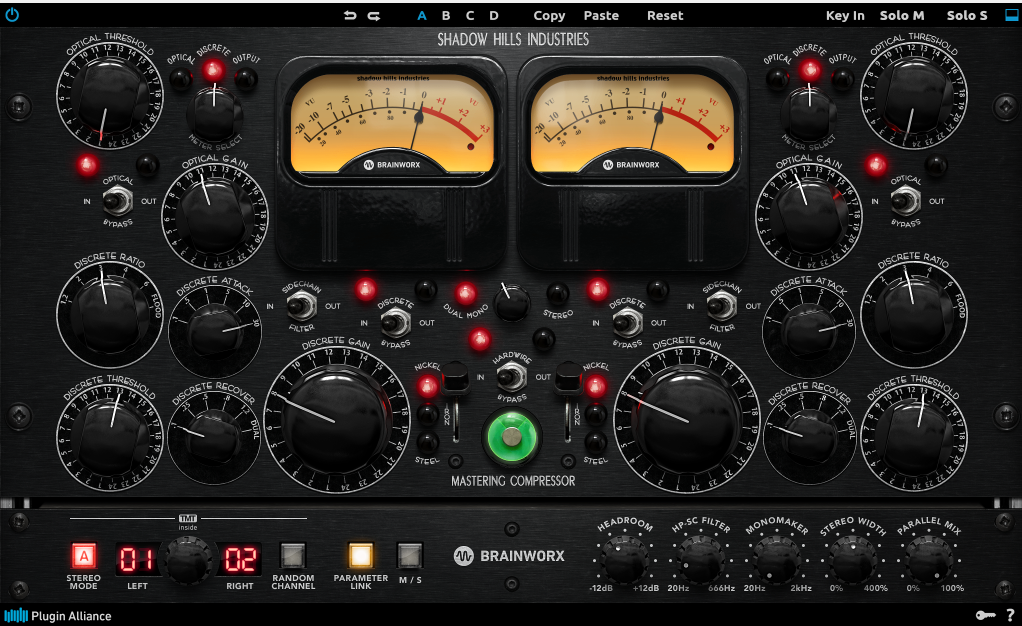
The 3 transformer modes Nickel (brightest saturation), Iron (most neutral sat) and Steel (Most low endy sat) are useful and can also be used on their own when not compressing if needed.
As a rule of thumb; only use the ‘discrete’ compressor on the master, as using the ‘optical’ compressor in this rolls off high end.
The ‘green’ standard Shadow Hills Mastering Compressor has a more frequency-neutral optical compressor so that can be used in combination with the discrete one if needed, but this ‘red” Class A version seems to have a bit more depth/polish to the overall sound and comes with additional controls like a stereo width enhancer.
Set OSx2.
– Review:
At first glance the Shadow Hills Class A Mastering Compressor by Brainworx looks quite complicated, greeting you with the kind of interface you’d expect in a spaceship.
But it gets less daunting once you realize that the size and complicity is mainly due to the compressor being split into two halves; a left and a right side, representing the left and right channel of the stereo image once in “dual mono” mode.
“Dual mono” is engaged by the button by the same name found near the center of the GUI, under the left meter.
This allows you to control the left and right channel differently from each other.
This is a cool option to have for sure, but most people are probably going to use it in the normal “Stereo” mode.
In Stereo mode things are pretty simple as only the controls on the left side are active, and those parameters control the whole plugin.
At the top of the GUI there is the “Meter Select” option, allowing you to switch between the meter showing either “Optical” or “Discrete” gain reduction. With their dedicated threshold and ratio knobs you can dial in the amount of optical and/or discrete compression you want, giving the unique possibly of combining the two compression styles.
I do like to combine the two styles of compression on the Shadow Hills Mastering Compressor, reviewed under “Drum Bus”, which is the green/blue version also offered by Brainworx via Plugin Alliance.
However on this “red” version, the Class A, I only like using ‘discrete’ on the master bus. That is due to a little bit of a high end roll-off occurring only in the Optical compressor in the red version.
So why not just use the regular blue/green version for the master bus, as it allows you to blend in optical compression without the roll-off? Because the two sound different. Class A has a more polished sound, a little bit more depth, perfect for master bus application while the green/blue version is a little less polished sounding but great for transients on the drum bus.
The strong suit of this plugin is the musical movement of the ‘discrete’ compression which is well suited for the stereo mix, as well as the ability to quickly swift between the 3 different transformer/saturation colors, to nail the tone needed for any song.
Sometimes I like to use it just as a color box on the master bus, without compressing at all but simply engaging one of the 3 transformer types.
With the TMT (“Tolerance Modeling Technology”) you essentially get 20 slightly different channels, which can be viewed as having different versions of the plugin to choose from. That adds another laying of realism in a hardware emulation, because hardware units vary subtly and even undergo small chances over time. The variations here include subtle changes in time constants, frequency response and stereo image.
I like to set oversampling in the DAW to OSx2 for this plugin, so if your DAW allows that you might do that, but for most it probably won’t be important as it sounds great as it is.
Shadow Hills Class A Mastering Compressor provides a ton of control over the sound in a very high quality package and has been rock solid in my experience.
Kotelnikov GE (TDR)
– TLDR Notes:
Extremely clear and clean master bus comp with nice compression action.
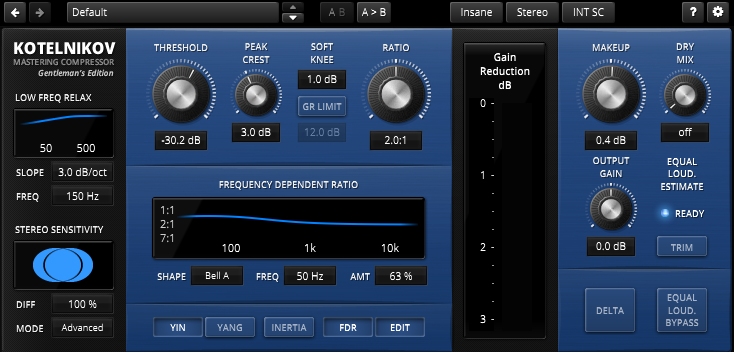
GE version has advantages for master bus application like “Insane” mode (max oversampling) for the clearest sound, Yin/Yang for adding in even-order harmonics along with the odd-order harmonics, as well as the FDR feature.
FDR is ”frequency dependent ratio”, so that the low end can still be compressed but more gently, thus keeping the lows better than a modeled algorithmic compressor normally would.
To access FDR click “FDR” and “EDIT” for access to the low end tilt.
Typically compressing up to 1 dB on the master bus.
– Review:
TDR, Tokyo Dawn Records/Tokyo Dawn Labs are in my experience some of the good guys in the audio software game.
They offer some of the best free plugins out there, notably Nova and Kotelnikov and awesome GE versions, Gentleman Editions, on top with added features and sound quality options.
Kotelnikov, the free version, is a terrific all-around clean compressor for track duties. I find that the compression movement works well on many sources. When it comes to master bus application there are some advantages that come with the paid GE version worth knowing about.
It allows “Insane” mood, which gives a leg up in terms of sound quality, critical to the master bus. You can add in a subtle amount of odd and even harmonics via the Yin and Yang buttons and the FDR feature is welcome.
FDR stands for ‘frequency dependent ratio”, and as the name implies it takes the frequency spectrum into account when it comes to ratio value. That means that the bassy low end can be compressed more gently for instance, a handy feature if the lows are already where you want them to be dynamically.
This can be done by enabling “FDR”, clicking on “EDIT”, and shaping the low end tilt with “FREQ” (Frequency) and “AMT” (amount).
You also get a side-chain labeled “Low Freq relax” to give the compressor circuit relief by preventing an overreaction from the lows. The goal being the prevention of pumping on the entire signal. This is more of a traditional side-chain that many mastering compressors have, but the neat thing about this feature on the Kotelnikov GE is that you get to control the slope of that filter which further adds to the level of control, a plus for mastering engineers.
And this is really just scraping the surface. Reading the manual is recommended as this is quite a comprehensive plugin.
Black Box HG-2MS (Plugin Alliance)
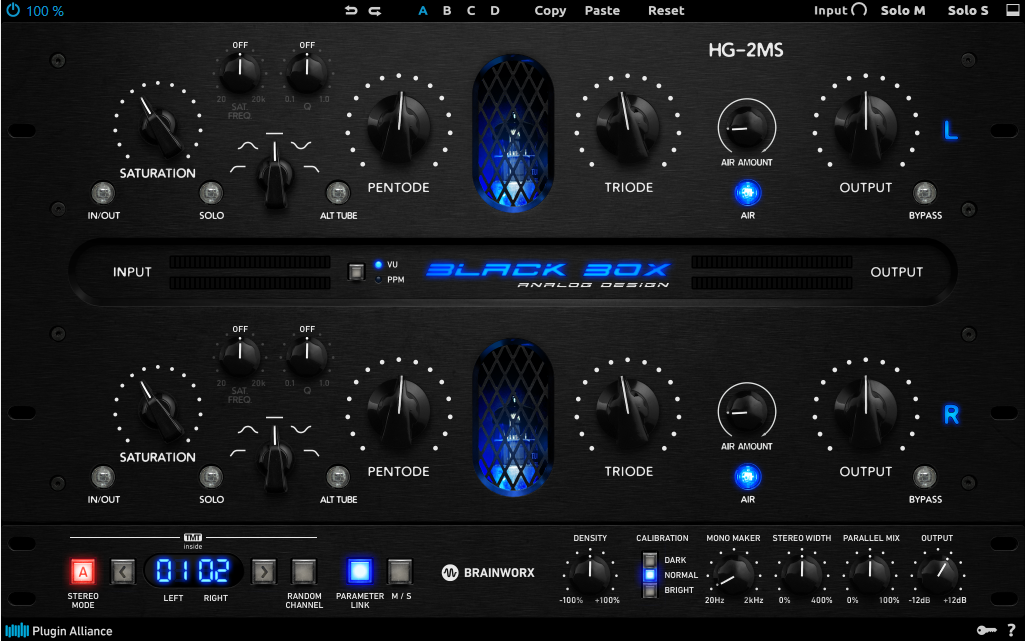
– TLDR Notes:
Tone shaping and saturation.
This is the MS version (Mid/Side version), but regular version can be used as well.
“Air” engaged and turned up a little bit for close emulation of the hardware.
– Review:
The regular Black Box HG-2 was already one of the best saturation plugins out there, but Brainworx decided to step up their game and create this extended version for master bus duties and mastering.
Harmonic distortion gives that pleasing sound that we’re used to hearing on countless recordings going through a lot of analog gear so in the box it’s essential to have good tools to achieve this.
The standard Black Box HG-2 provides excellent sounding harmonic distortion which results in increased perceived loudness at a given peak value that happens to be perfectly suitable for the master bus.
This MS version retains that sound quality but offers addition sound shaping options.
Just like the standard version you can use “Saturation” control to dial in parallel saturation. Parallel saturation is often ideal for the master bus where you might not want to destroy things by being too heavy-handed with distortion but still want to increase that subtle sense of life combined with some perceived loudness.
The original Black Box HG-2 had “Low”, “Flat” and “High” variants to determine which frequencies were contained in the saturation, but this MS version takes it a step further and instead offers a frequency knob labeled “SAT. FREQ”, as well as different curves for the selected frequency, ‘Bell’, ‘HiPass’, ‘BandStop’ and ‘LowPass’ with handy little icons showing what each filter actually does.
These are great options for control freaks.
The “Pentode” tube gives pleasant even order harmonics, and the “Triode” tube has a grittier “ovendriven tape” style saturation with its third order harmonics.
With this is the Mid/Side version of the plugin you can now control the left/right channels independently if you wish, or both at the same time with the “Parameter Link” enabled at the bottom of the GUI.
Another addition to the MS version is the TMT technology, so you get 20 slightly different channels and Stereo Width. The Stereo Width features sounds good on the Black Box, but as always Stereo Width should be used with care, but a touch of it can be beneficial to some mixes. To evaluate your choices, especially when it comes to width modifications on a master bus the arrows at the top of the GUI are useful, where you can go back and forth between the chances to quickly determine the benefits vs drawbacks.
SPL Vitalizer MK2-T (Plugin Alliance)

– TLDR Notes:
Nice and smooth exciter for the master bus. Good if the mix needs more polish, brightness and/or stereo expansion.
– Review:
If you tend to mix fairly warmly and often need to add high end and clarity along the way, then this plugin almost feels like cheating. It’s perfect for giving a sense of polish, brightness and stereo width.
Based on the tube version of the renowned SPL Vitalize which has two Sovtek 12AX7 double triode tubes and delivers premium sound quality, I view the plugin as a sound enhancement tool more than a tool for fixing or repairing issues.
Make sure the problems are addressed on a track-level in the mix, then use this plugin for some high quality fairy-dust.
Even though the original unit has tubes, the “Drive” parameter here is not saturation/tube overdrive but a sensitivity dial for the filters. Increase the “Drive” and the processing kicks in sooner, which manifests as long as “process” or “intensity” are not at 0.
There is also a ‘Compression’ dial, which is tied to just the bass part of the source. I think there are much better plugins out there for compressing low end so I don’t touch the low end compression parameter on the plugin, but it’s there for those who need a one-knob compression solution for the low end part of a signal.
You can manually tone-shape with the ‘Mid-Hi-Tune’ knob. Turn it left for a mellower sound, right for a brighter one. The ‘Process’ knob determines how much of this effect you will hear. At the same time the “Bass” knob, where you set the degree of either ‘softness’ or ‘tightness’ of the bass, is also adjusted by the “Process” dial which again determines the amount.
‘LC-EQ’ works in a somewhat similar way to ‘Mid-Hi-Tune’, shaping the mids and highs via its frequency selection, with the neighboring “intensity” dial responsible for the amount.
These are interesting ways to tone-shap a mix that forces you to use your ears rather than your eyes.
So where does the plugin truly excel? Well, a huge strength of the plugin is that it manages to bring that extra clarity to the mix through the patented filtering techniques leading to unmasking. This is courtesy of very slight time shifts in the loudest frequencies, thereby unmasking the overlapping frequencies.
It also uses equal-loudness contours, taking advantage of what we know about human hearing in order to achieve more perceived loudness while retaining peak levels, again very handy on the master-bus.
The stereo width knob named “Stereo Expander” is another great feature. It’s actually one of the in-the-box best stereo width effects out there in my book, along with Ozone’s terrific imager.
After listening to the effect, I like to test stereo wideners simply by checking their impact on the mix in mono, to see if they ruin mono compatibility, and that is luckily not the case with Stereo Expander in the Vitalizer. That doesn’t mean it should be used completely irresponsibly on the master-bus of course. Every mix doesn’t even need a stereo widener, and for the ones that do I personally prefer to stay below the value of 4 (out of 20 in this case). Keep it at a low value and this one adds dimension without being detrimental to the mix.
Because of the advanced processing at play here, the filters, the psycho-acoustics, I can’t think of another plugin that can slide in and replace it.
Tonal Balance Control 2 / 2.2 (Izotope)
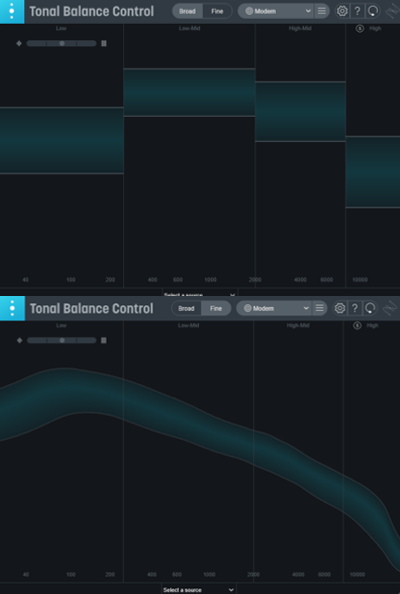
– TLDR Notes:
Great tool to quickly check the frequency content of a mix up against the average tonally balanced mix.
– Review:
Here’s a really good idea for a plugin, and a greatly beneficial tool as long as it’s thought of as a “second opinion” on your mix – a quick reference and not an absolute final answer.
You just place it on the master-bus, play your session and Tonal Balance 2 shows you where your frequency content is compared to the average of decades of recorded music within the relevant genre.
Izotope used thousands of commercially released songs to arrive at their target curves for the plugin.
You have to wonder why it took so long for a plugin developer to come up with this idea.
Here’s the caveat though: Every arrangement is different even when there are some similarities. So you still need to use your ears which is a good thing, after all that’s the most fun part of working with audio. But as a reference and a second opinion this is a really useful tool.
It’s very simple to use. After you pick your genre you have the two modes ‘Broad’ and ‘Fine’ and they do what the names imply. When in ‘Broad’ mode it shows the broader areas divided into boxers for lows, low-mids, high-mids and highs. When the song is playing in its full arrangement phase, meaning with full drums, bass, guitars and vocals (as opposed to a quiet verse with sparse instrumentation) the lines need to be in the middle of the boxers if you aim to hit the average tonal balance.
When you’re in “Fine” mode the boxes are gone, and you want the dynamic line to be roughly in the middle of the path when the song is playing with full arrangement.
In addition to the two main modes, you can create your own target curve from any reference wav file on your computer which is a great feature. That way you can match up the genre and style of song more precisely.
I think it’s important to underline that one of biggest mistakes you can make with Tonal Balance 2 is becoming too hung up on tiny details. It’s meant to provide a rough guide, so if you’re tweaking the mix to make sure every part of the spectrum is slap bang in the middle of the path, instead of using your ears, it’s a fail.
But say you are mixing without a sub, or your room is less than ideal, Tonal Balance 2 might actually reveal some big discrepancies that point you in the direction of certain areas on which to focus.
You might want to use it early in the mix as well, not just near the end, to make sure you’re in the right ballpark going forward.
For most things the ‘Modern’ preset will do, so I changed the default loading preset to “Modern” in the DAW, since for some reason it loads with the ‘Bass Heavy’ preset per default, a choice I find odd. In my opinion “Modern” is the most general and will do for most mixes in the pop-rock, indie, alt-pop genre, but if you’re doing jazz or EDM there are presets for that as well.